Doctor Who/Covers/Home video/VHSes/Australia: Difference between revisions
StalwartUK (talk | contribs) m (→Box sets) |
m (galleries look best when they're centered and their captions are centered) |
||
| Line 1: | Line 1: | ||
===First Doctor=== | ===First Doctor=== | ||
<gallery hideaddbutton="true" widths="120"> | <gallery postition=center captionalign=center hideaddbutton="true" widths="120"> | ||
File:An Unearthly Child VHS Australian cover.jpg|[[An Unearthly Child]] | File:An Unearthly Child VHS Australian cover.jpg|[[An Unearthly Child]] | ||
File:An Unearthly Child VHS Australian folded out cover.jpg|[[An Unearthly Child]]<br />(full cover) | File:An Unearthly Child VHS Australian folded out cover.jpg|[[An Unearthly Child]]<br />(full cover) | ||
| Line 18: | Line 18: | ||
=== Second Doctor === | === Second Doctor === | ||
<gallery hideaddbutton="true" widths="120"> | <gallery postition=center captionalign=center hideaddbutton="true" widths="120"> | ||
File:The Tomb of the Cybermen VHS Australian cover.jpg|[[The Tomb of the Cybermen]] | File:The Tomb of the Cybermen VHS Australian cover.jpg|[[The Tomb of the Cybermen]] | ||
File:The Ice Warriors VHS Australian cover.jpg|[[The Ice Warriors]]<br />[[The Missing Years]] | File:The Ice Warriors VHS Australian cover.jpg|[[The Ice Warriors]]<br />[[The Missing Years]] | ||
| Line 30: | Line 30: | ||
=== Third Doctor === | === Third Doctor === | ||
<gallery hideaddbutton="true" widths="120"> | <gallery postition=center captionalign=center hideaddbutton="true" widths="120"> | ||
File:Doctor Who and the Silurians VHS Australian cover.png|[[Doctor Who and the Silurians]] | File:Doctor Who and the Silurians VHS Australian cover.png|[[Doctor Who and the Silurians]] | ||
File:The Ambassadors of Death VHS Australian cover.jpg|[[The Ambassadors of Death]] | File:The Ambassadors of Death VHS Australian cover.jpg|[[The Ambassadors of Death]] | ||
| Line 51: | Line 51: | ||
=== Fourth Doctor === | === Fourth Doctor === | ||
<gallery hideaddbutton="true" widths="120"> | <gallery postition=center captionalign=center hideaddbutton="true" widths="120"> | ||
File:The Sontaran Experiment-The Genesis of the Daleks VHS Australian cover.jpg|[[The Sontaran Experiment]]<br />[[Genesis of the Daleks]] (double tape) | File:The Sontaran Experiment-The Genesis of the Daleks VHS Australian cover.jpg|[[The Sontaran Experiment]]<br />[[Genesis of the Daleks]] (double tape) | ||
File:Revenge of the Cybermen VHS Australian rerelease cover.jpg|[[Revenge of the Cybermen]] (re-release) | File:Revenge of the Cybermen VHS Australian rerelease cover.jpg|[[Revenge of the Cybermen]] (re-release) | ||
| Line 89: | Line 89: | ||
=== Fifth Doctor === | === Fifth Doctor === | ||
<gallery hideaddbutton="true" widths="120"> | <gallery postition=center captionalign=center hideaddbutton="true" widths="120"> | ||
File:Castrovalva VHS Australian cover.jpg|[[Castrovalva (TV story)|Castrovalva]] | File:Castrovalva VHS Australian cover.jpg|[[Castrovalva (TV story)|Castrovalva]] | ||
File:Kinda VHS Australian cover.jpg|[[Kinda (TV story)|Kinda]] | File:Kinda VHS Australian cover.jpg|[[Kinda (TV story)|Kinda]] | ||
| Line 107: | Line 107: | ||
=== Sixth Doctor === | === Sixth Doctor === | ||
<gallery hideaddbutton="true" widths="120"> | <gallery postition=center captionalign=center hideaddbutton="true" widths="120"> | ||
File:The Twin Dilemma VHS Australian cover.jpg|[[The Twin Dilemma]] | File:The Twin Dilemma VHS Australian cover.jpg|[[The Twin Dilemma]] | ||
File:Attack of the Cybermen VHS Australian cover.jpg|[[Attack of the Cybermen]] | File:Attack of the Cybermen VHS Australian cover.jpg|[[Attack of the Cybermen]] | ||
| Line 117: | Line 117: | ||
=== Seventh Doctor === | === Seventh Doctor === | ||
<gallery hideaddbutton="true" widths="120"> | <gallery postition=center captionalign=center hideaddbutton="true" widths="120"> | ||
File:Time and the Rani VHS Australian cover.jpg|[[Time and the Rani]] | File:Time and the Rani VHS Australian cover.jpg|[[Time and the Rani]] | ||
File:Paradise Towers VHS Australian cover.jpg|[[Paradise Towers (TV story)|Paradise Towers]] | File:Paradise Towers VHS Australian cover.jpg|[[Paradise Towers (TV story)|Paradise Towers]] | ||
| Line 130: | Line 130: | ||
=== Eighth Doctor === | === Eighth Doctor === | ||
<gallery hideaddbutton="true" widths="120"> | <gallery postition=center captionalign=center hideaddbutton="true" widths="120"> | ||
Doctor_Who_TVM_VHS_Australian_cover.jpg | Doctor_Who_TVM_VHS_Australian_cover.jpg | ||
</gallery> | </gallery> | ||
=== Other releases === | === Other releases === | ||
<gallery hideaddbutton="true" widths="120"> | <gallery postition=center captionalign=center hideaddbutton="true" widths="120"> | ||
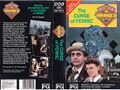
File:Australian VHS TheCurseofFatalDeath cover.jpg|[[The Curse of Fatal Death]] | File:Australian VHS TheCurseofFatalDeath cover.jpg|[[The Curse of Fatal Death]] | ||
</gallery> | </gallery> | ||
=== Box sets === | === Box sets === | ||
<gallery hideaddbutton="true" widths="120"> | <gallery postition=center captionalign=center hideaddbutton="true" widths="120"> | ||
File:The Crusade and The Space Museum VHS Australian cover.jpg|[[The Crusade]]<br />[[The Space Museum]] | File:The Crusade and The Space Museum VHS Australian cover.jpg|[[The Crusade]]<br />[[The Space Museum]] | ||
File:The Five Doctors and The Kings Demons VHS box set Australian cover.jpg|[[The Five Doctors (TV story)|The Five Doctors]] (special edition) and [[The King's Demons]] box set | File:The Five Doctors and The Kings Demons VHS box set Australian cover.jpg|[[The Five Doctors (TV story)|The Five Doctors]] (special edition) and [[The King's Demons]] box set | ||
Revision as of 18:16, 28 November 2013
First Doctor
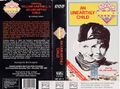
An Unearthly Child
(full cover)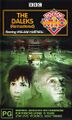
The Daleks (Remastered)


Second Doctor
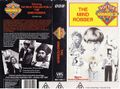
The Mind Robber (whole VHS cover)
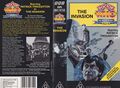
The Invasion
(whole VHS cover)


Third Doctor
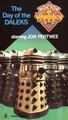
Day of the Daleks (1987 cover)
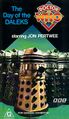
Day of the Daleks (reissue)
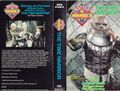
The Time Warrior
(folded out cover)


Fourth Doctor
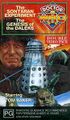
The Sontaran Experiment
Genesis of the Daleks (double tape)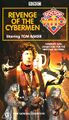
Revenge of the Cybermen (re-release)
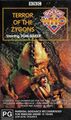
Terror of the Zygons (re-release)
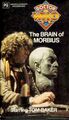
The Brain of Morbius
(1987 heavily edited movie edition)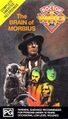
The Brain of Morbius
(1991 unedited edition)- The Face of Evil VHS Australian cover.png
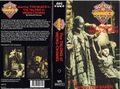
The Talons of Weng-Chiang
(folded out cover)- Image of the Fendahl VHS Australian cover.png


Fifth Doctor
- Arc of Infinity VHS Australian cover.png

The Five Doctors
(full cover)- The Five Doctors SE VHS Australian cover.jpg
The Five Doctors
(Special Edition) 
Resurrection of the Daleks
(first release)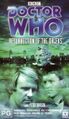
Resurrection of the Daleks
(Rerelease)


Sixth Doctor


Seventh Doctor
The Curse of Fenric
(folded out cover)


Eighth Doctor

Other releases

Box sets
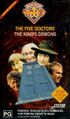
The Five Doctors (special edition) and The King's Demons box set

Rear spine of:
The Five Doctors (special edition) and The King's Demons
Doctor Who playing cards included with The Five Doctors (special edition) and The King's Demons box set
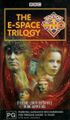
The E-Space Trilogy:
Full Circle, State of Decay, Warriors' Gate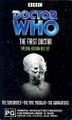
VHS box set coverThe Sensorites
The Time Meddler
The Gunfighters


