Dust Breeding (audio story): Difference between revisions
m ({{bigfinish}} updated) |
No edit summary Tag: 2017 source edit |
||
| (48 intermediate revisions by 21 users not shown) | |||
| Line 1: | Line 1: | ||
{{title dab away}} | {{title dab away}} | ||
{{real world}} | {{real world}} | ||
{{Infobox Story | {{Infobox Story SMW | ||
|image=Dust Breeding cover.jpg | |image = Dust Breeding cover.jpg | ||
|range = Main Range | |range = Main Range | ||
|number in range = 21 | |number in range = 21 | ||
|series=[[ | |series = ''[[Main Range]]'' | ||
|number= 21 | |number = 21 | ||
|script=The Audio Scripts: Volume Two | |script = The Audio Scripts: Volume Two | ||
|doctor=Seventh Doctor | |doctor = Seventh Doctor | ||
|companions= [[Ace]] | |companions = [[Ace]], [[Bev Tarrant|Bev]] | ||
|enemy= | |enemy = [[Krill]], {{Pratt|c}}, [[Warp Core]] | ||
|setting= [[Duchamp 331]], [[26th century]] | |setting = [[Duchamp 331]], [[26th century]] | ||
|writer= [[ | |writer = Mike Tucker | ||
| | |director = [[Gary Russell]] | ||
|music= [[Russell Stone]] | |producer = [[Jason Haigh-Ellery]] and [[Gary Russell]] | ||
|sound= [[Gareth Jenkins]] | |music = [[Russell Stone]] | ||
|cover=[[Clayton Hickman]] | |sound = [[Gareth Jenkins (sound designer)|Gareth Jenkins]] | ||
|publisher= Big Finish Productions | |cover = [[Clayton Hickman]] | ||
|release date= | |publisher = Big Finish Productions | ||
|format= | |release date = 18 June 2001 | ||
|production code= [[List of production codes|7T]] | |format = 2 CDs<br/>Download | ||
|isbn= ISBN 1- | |production code = [[List of production codes|7T]] | ||
|trailer = {{StoryTitle}}.ogg | |isbn = ISBN 978-1-90365-433-0 (physical); ISBN 978-1-84435-714-7 (digital) | ||
|prev= Loups-Garoux (audio story) | |trailer = {{StoryTitle}}.ogg | ||
|next= Bloodtide (audio story)}} | |prev = Loups-Garoux (audio story) | ||
'''''{{StoryTitle}}''''' was the twenty-first story in [[Big Finish Productions|Big Finish]]'s [[Main Range|monthly range]]. It was written by [[Mike Tucker]] and featured [[Sylvester McCoy]] as the [[Seventh Doctor]] | |next = Bloodtide (audio story) | ||
|made prev = Bloodtide (audio story) | |||
|made next = The One Doctor (audio story) | |||
|epcount = 4 | |||
}}{{spotify|album=7H9ygDei6s9KFqtVxgvJt9|height=350}} | |||
'''''{{StoryTitle}}''''' was the twenty-first story in [[Big Finish Productions|Big Finish]]'s [[Main Range|monthly range]]. It was written by [[Mike Tucker]] and featured [[Sylvester McCoy]] as the [[Seventh Doctor]], [[Sophie Aldred]] as [[Ace]] and [[Louise Faulkner]] as [[Bev Tarrant]]. | |||
It also debuted in audio form [[the Master]] voiced by [[Geoffrey Beevers]] who had last played the role in ''[[The Keeper of Traken (TV story)|The Keeper of Traken]]'' in 1981. | It also debuted in audio form [[the Master]] voiced by [[Geoffrey Beevers]], who had last played the role in ''[[The Keeper of Traken (TV story)|The Keeper of Traken]]'' in 1981. It also featured [[Caroline John]], known to play the [[Third Doctor]]'s companion [[Liz Shaw]], playing [[Salvadori|another character]]. | ||
== Publisher's summary == | == Publisher's summary == | ||
| Line 34: | Line 39: | ||
Why is there a colony of artists on a planet that is little more than a glorified garage? What is the event that the passengers of the huge, opulent pleasure cruiser 'Gallery' are hoping to see? And what is hidden in the crates that litter the cargo hold? | Why is there a colony of artists on a planet that is little more than a glorified garage? What is the event that the passengers of the huge, opulent pleasure cruiser 'Gallery' are hoping to see? And what is hidden in the crates that litter the cargo hold? | ||
[[The Doctor's diary]] indicates that the painting is about to be destroyed in "mysterious circumstances", and when [[Seventh Doctor|he]] and [[Ace]] arrive on Duchamp 331, those circumstances are well underway. | [[Nine Hundred Year Diary|The Doctor's diary]] indicates that the painting is about to be destroyed in "mysterious circumstances", and when [[Seventh Doctor|he]] and [[Ace]] arrive on Duchamp 331, those circumstances are well underway. | ||
== Plot == | == Plot == | ||
=== Part one === | |||
On [[1920s]] [[Earth]], two doctors discuss about one of their patients, [[Edvard Munch]] the painter, who claims to be haunted by a mysterious voice. One of the two doctors informs the other the painter managed to create a picture, ''[[The Scream]],'' representing the voice, and now seems calmer. | |||
Centuries later, the Doctor shows Ace a room in [[The Doctor's TARDIS|the TARDIS]] where he keeps works of art he claims to have "saved" from mysterious disappearances, and informs her they are on their way to perform another one of those "rescues". They are directed towards [[Duchamp 331]], a desolate planet destined to be a pit stop, but also the place where an artist, [[Damien Pierson]], has founded an art centre with a gallery in it. Inside the gallery, there is a copy of Munch's ''Scream'' - the painting the Doctor wants to get. | |||
Meanwhile, | Meanwhile, another ship is directed towards Duchamp 331: a luxury cruise led by [[Salvadori|Madam Salvadori]], a self-proclaimed art lover, and her right-hand man, [[Klemp]]. Amongst their many guests, members of the elites of the universe, there is also the mysterious and wealthy Mr. Seta, whose identity neither of them manage to ascertain, and which brought on board a mysterious cargo. | ||
Upon their arrival, the Doctor and Ace come across a desolate scenario. Not only is Duchamp 331 nothing but a great sphere made of [[dust]], but the refill station they land on has been ravaged quite recently. They find only one survivor, and bring him to the main station which houses the art gallery. Here they are reunited with [[Bev Tarrant]], a previous acquaintance, and meet [[Guthrie (Dust Breeding)|Guthrie]], the station manager, and Damien himself, who explains his project. The Doctor sends Ace to take a look at the gallery, as he and Bev check upon the survivor. | |||
Ace enters the gallery and finds the painting of ''The Scream'', but as soon as she glances upon it, she hears a voice screaming into her head and runs away in fear. In the morgue, the Doctor and Bev cut open the corpse of the man they saved and discover it's entirely made of dust; as they still try to figure out what it means, the dust reanimates and attacks them. | |||
The Doctor | === Part two === | ||
The Doctor is able to slightly open a vent, ridding them of the dust and saving his and Bev's life. Guthrie also arrives to open the door of the morgue, escaping in time and avoid being attacked by dust too. Encouraged by the Doctor, Guthrie tells them about the death of his partner, years ago, when they were building the station: the dust attacked them, and his partner was killed. Bev is ready to dismiss the story as an invention, but the Doctor instead accepts it as true, and gathers the dust really is animated and someone controls it - probably Damien. | |||
In the meantime, Ace has stumbled across Damien, looking on the Doctor and Bev being attacked by the dust. Discovered, Damien knocks her out and shuts her in the gallery, waiting for the entity whose voice he hears from years to make her "connected" with it. The Doctor reaches Damien in time in the gallery and takes her place, connecting himself with the entity inside ''The Scream''; at the same time, following the Doctor's instructions, Bev and Guthrie try planning an evacuation of the place. | |||
Aboard Salvadori's ship, she and Klemp investigate the death of one of their guards, whom Seta killed as he approached his mysterious cargo. Seta threatens Salvadori of terrible consequences if they do not reach Duchamp 331 in time, but the woman, unfazed, orders Klemp and his men to open Seta's cargo. They find four eggs of unknown origin. Seta reaches for them and, using a device, causes the eggs to open, freeing four [[Krill]]s who attack the crew. He also hypnotizes Seta, who then reveals himself to be {{Pratt}}. | |||
=== Part three === | |||
The four Krills decimate the crew and the guests of Salvadori's luxury ship, while the Master keeps her and Klemp hostages, so that the ship remains on its course to Duchamp 331. He intends to arrive there and pit the Krills against the entity. On Duchamp 331, the entity is possessing the Doctor and talks through him to Ace, introducing himself as [[Warp Core|the Warp Core]], a sentient weapon created by an ancient civilization, later abandoned by its creators when they realised it was unstoppable. He found refuge on Earth, where he inspired and tortured Munch by acting upon his fears and obsessions, to the point Munch made a painting to trap him, and succeeded. | |||
When the Doctor finally takes back his body, he realises the Warp Core has inspired and controlled Damien into gathering the colony of artists, whose minds he absorbed, getting enough power to control the entire planet and its dust. The Doctor confronts Damien, but the Warp Core has already gathered enough energy to free itself from the painting and take possession not only of Damien's mind, but of the whole planet. The Doctor, Bev and Ace barely managed to get out, the first one into the TARDIS, the other two on Bev's ship; Guthrie stays back to confront the dust to avenge his partner. | |||
With Salvadori's ship in sight, all the survivors climb aboard, on two different levels. Bev and Ace come across a Krill (which the latter recognizes from a previous adventure), while the Doctor stumbles upon the Master. | |||
=== Part four === | |||
The Master tells the Doctor the Warp Core was created to fight against the Krills; it's the only being they fear. He is bringing them to Duchamp 331 hoping they will fight against each other, thus weakening the Core enough for the Master to shut the Warp Core inside his TARDIS. He already tried that by stealing ''The Scream'' painting, but the Warp Core proved impossible for him to subdue; the Master lost his [[Trakenite]] body in the fight, and was reduced to his previous "decayed" form. | |||
Ace and Bev, together with Salvadori, reach the Doctor and the Master avoiding the Krills; on the way, Bev scares away a Krill apparently only by shouting at it. The Warp Core approaches them and recognizes the Master, who claims to be behind his recollocation<sup>[?]</sup> to Duchamp 331 (the planet of the Krills after the Core destroyed it), Damien's foundation of the art centre and Salvadori's cruise, and proposes him an alliance against the Krills. He tries to offer Salvadori's life as a pledge, but Klemp breaks the Master's hold on his mind long enough to save Salvadori and be killed in her place. The Warp Core refuses the Master's offer and tries to kill everyone. | |||
The Doctor, Ace, Bev and Salvadori escape and try to reach the TARDIS at the lower levels of the ship. When Ace tells him about the Krill scared by Bev, the Doctor realizes the dust on Bev's body frightens the Krills since it's a part of the Core's body. When they come across another Krill, Bev tries the trick again, but this time it does not work; only Salvadori's sacrifice allows the three of them to enter the TARDIS and save themselves from the Krill. Inside the TARDIS, the Doctor mentally contacts the Master and tries taking control of the dust to fight the Core, using also the energy from the Master's TARDIS. He eventually wins when, on the planet, Guthrie blows out his station with a lighter, engulfing the entire planet in a giant explosion and destroying the station and the Core. | |||
The Doctor and Ace head back to Earth, visiting an art gallery to admire ''The Scream''. The Doctor tells Ace the Core has been destroyed, but he is not sure whether the Master survived. He also gathers they have to bring Bev back to her own time - before she steals something from the museum they're in. Ace jokingly suggests the Doctor should take up collecting stamps instead in future. | |||
== Cast == | == Cast == | ||
* [[Seventh Doctor|The Doctor]] - [[Sylvester McCoy]] | * [[Seventh Doctor|The Doctor]] - [[Sylvester McCoy]] | ||
* [[Ace]] - [[Sophie Aldred]] | * [[Ace]] - [[Sophie Aldred]] | ||
* [[ | * [[Decayed Master|Mr Seta]] / The Master - [[Geoffrey Beevers]] | ||
* [[Salvadori|Madame Salvadori]] - [[Caroline John]] | * [[Salvadori|Madame Salvadori]] - [[Caroline John]] | ||
* [[Bev Tarrant]] - [[Louise | * [[Bev Tarrant]] - [[Louise Faulkner]] | ||
* [[Guthrie (Dust Breeding)|Guthrie]] - [[Ian Ricketts]] | * [[Guthrie (Dust Breeding)|Guthrie]] - [[Ian Ricketts]] | ||
* [[Klemp]] / [[Ambassador (Dust Breeding)|Ambassador]] - [[Mark Donovan]] | * [[Klemp]] / [[Ambassador (Dust Breeding)|Ambassador]] - [[Mark Donovan]] | ||
| Line 63: | Line 89: | ||
* [[Skredsvig]] - [[Jez Fielder]] | * [[Skredsvig]] - [[Jez Fielder]] | ||
* [[Maggie (Dust Breeding)|Maggie]] - [[Jane Goddard]] | * [[Maggie (Dust Breeding)|Maggie]] - [[Jane Goddard]] | ||
* [[Krill|The Krill]] - [[Gareth Jenkins]] | * [[Krill|The Krill]] - [[Gareth Jenkins (sound designer)|Gareth Jenkins]] | ||
* Lift Computer - [[Jacqueline Rayner]] | * Lift Computer - [[Jacqueline Rayner]] | ||
* Museum Announcer - [[Mark Wyman]] | * Museum Announcer - [[Mark Wyman]] | ||
== | == Crew == | ||
* Cover Art - [[Clayton Hickman]] | |||
* Director - [[Gary Russell]] | |||
* Executive Producer - [[Jacqueline Rayner]] | |||
* Music - [[Russell Stone]] | |||
* Producers - Gary Russell and [[Jason Haigh-Ellery]] | |||
* Sound Design - [[Gareth Jenkins (sound designer)|Gareth Jenkins]] | |||
* Writer - [[Mike Tucker]] | |||
== Worldbuilding == | |||
* The [[Warp Core]] strips the Master's previous body, leaving only his original decaying [[Time Lord]] body. | * The [[Warp Core]] strips the Master's previous body, leaving only his original decaying [[Time Lord]] body. | ||
== Gallery == | |||
<gallery position="center" captionalign="center" hideaddbutton="true" widths="250"> | |||
Dust Breeding cover.jpg |Original CD cover | |||
Doctor-Who-Magazine-306dust.jpg.jpg|Art by [[Lee Sullivan]] featured in [[DWM 306]] | |||
Dust Breeding DWM preview clean.jpg|Textless version of the DWM preview art | |||
</gallery> | |||
== Notes == | == Notes == | ||
* This was the audio debut for [[Geoffrey Beevers]] as [[the Master]], which also marked the first appearance of the character in an audio drama. | * This was the audio debut for [[Geoffrey Beevers]] as [[the Master]], which also marked the first appearance of the character in an audio drama. | ||
* An illustrated preview for this story featured [[DWM 306]] illustrated by [[Lee Sullivan]]. | * An illustrated preview for this story featured [[DWM 306]] illustrated by [[Lee Sullivan]]. | ||
* This audio drama was recorded on [[31 March (production)|31 March]] and [[21 April (production)|21]] and [[22 April (production)|22 April]] 2001. | * This audio drama was recorded on [[31 March (production)|31 March]] and [[21 April (production)|21]] and [[22 April (production)|22 April]] [[2001 (production)|2001]] at [[the Moat Studios]]. | ||
* The first two editions of ''[[aHistory]]'' dated this story to circa 4260, but the third edition redates it to circa 5257 in keeping with the redating of ''[[The Genocide Machine]]''. | * The first two editions of ''[[aHistory]]'' dated this story to circa 4260, but the third edition redates it to circa 5257 in keeping with the redating of ''[[The Genocide Machine (audio story)|The Genocide Machine]]''. | ||
* [[Andy Hardwick]]'s score to the story, alongside the scores to ''[[The Rapture (audio story)|The Rapture]]'' and ''[[Bang-Bang-a-Boom! (audio story)|Bang-Bang-a-Boom!]]'' was released on the CD ''[[Music from the Seventh Doctor Audio Adventures (soundtrack)|Music from the Seventh Doctor Audio Adventures]]''. | * [[Andy Hardwick]]'s score to the story, alongside the scores to ''[[The Rapture (audio story)|The Rapture]]'' and ''[[Bang-Bang-a-Boom! (audio story)|Bang-Bang-a-Boom!]]'' was released on the CD ''[[Music from the Seventh Doctor Audio Adventures (soundtrack)|Music from the Seventh Doctor Audio Adventures]]''. | ||
* Big Finish Productions had invited [[Anthony Ainley]] to reprise his role of the Master, but were unable to reach a suitable deal with him. The Tremas Master was thus written out by having the Warp Core strip the Master of his previous body, leaving behind his previous emaciated form — thus allowing [[Geoffrey Beevers]] to take over the role. | * Big Finish Productions had invited [[Anthony Ainley]] to reprise his role of the Master, but were unable to reach a suitable deal with him. The Tremas Master was thus written out by having the Warp Core strip the Master of his previous body, leaving behind his previous emaciated form — thus allowing [[Geoffrey Beevers]] to take over the role. | ||
* This story is placed between ''[[Survival (TV story)|Survival]]'' and [[Doctor Who (TV story)|the 1996 TV Movie]]. | |||
* This story was originally released on CD. It is now available as a download, as well as to stream on [[Spotify]]. | |||
== Continuity == | == Continuity == | ||
* The [[Krill]] previously appeared in [[PROSE]]: ''[[Storm Harvest]]''. | * The [[Krill]] previously appeared in [[PROSE]]: ''[[Storm Harvest]]''. | ||
* [[Bev Tarrant]] last appeared in [[AUDIO]]: ''[[The Genocide Machine]]'' and would later go on to appear in the [[Big Finish Productions]] [[Bernice Summerfield (series)|''Bernice Summerfield'' series]]. | * [[Bev Tarrant]] last appeared in [[AUDIO]]: ''[[The Genocide Machine (audio story)|The Genocide Machine]]'' and would later go on to appear in the [[Big Finish Productions]] [[Bernice Summerfield (series)|''Bernice Summerfield'' series]]. | ||
* The Doctor would encounter this incarnation of the Master once again on [[Perfugium]] in the [[far future]]. At that time, the Master believed himself to be a surgeon named "[[The Master's aliases#Doctor John Smith|Doctor John Smith]]." ([[AUDIO]]: ''[[Master (audio story)|Master]]'') | * The Doctor would encounter this incarnation of the Master once again on [[Perfugium]] in the [[far future]]. At that time, the Master believed himself to be a surgeon named "[[The Master's aliases#Doctor John Smith|Doctor John Smith]]." ([[AUDIO]]: ''[[Master (audio story)|Master]]'') | ||
* In his art gallery, the Doctor has a copy of the ''[[Mona Lisa]]''. He tells Ace the one in the [[Louvre]] has "This is a fake" written in felt tip. It is implied that the Doctor has the original. ([[TV]]: ''[[City of Death (TV story)|City of Death]]'') | * In his art gallery, the Doctor has a copy of the ''[[Mona Lisa]]''. He tells Ace the one in the [[Louvre]] has "This is a fake" written in felt tip. It is implied that the Doctor has the original. ([[TV]]: ''[[City of Death (TV story)|City of Death]]'') | ||
** When the Doctor returned to the Louvre in his [[ninth incarnation]], he said he preferred the original. ([[PROSE]]: ''[[Have You Seen This Man? (short story)|Have You Seen This Man?]]'') | |||
* The Master refers to the Traken source for his previous body. ([[TV]]: ''[[The Keeper of Traken (TV story)|The Keeper of Traken]]'') | * The Master refers to the Traken source for his previous body. ([[TV]]: ''[[The Keeper of Traken (TV story)|The Keeper of Traken]]'') | ||
* [[The Master's TARDIS]] is once again in the form of a pillar. ([[TV]]: ''[[Logopolis (TV story)|Logopolis]]'', ''[[Castrovalva (TV story)|Castrovalva]]'', ''[[Time-Flight (TV story)|Time Flight]]'') | * [[The Master's TARDIS]] is once again in the form of a pillar. ([[TV]]: ''[[Logopolis (TV story)|Logopolis]]'', ''[[Castrovalva (TV story)|Castrovalva]]'', ''[[Time-Flight (TV story)|Time Flight]]'') | ||
* The Doctor has a sculpture constructed by a Terileptil artist. ([[TV]]: ''[[The Visitation (TV story)|The Visitation]]'') | * The Doctor has a sculpture constructed by a Terileptil artist. ([[TV]]: ''[[The Visitation (TV story)|The Visitation]]'') | ||
* The Master has been stripped of his Trakenite body before. ([[PROSE]]: ''[[The Velvet Dark (short story)|The Velvet Dark]]'', ''[[The Quantum Archangel (novel)|The Quantum Archangel]]'') | |||
== External links == | == External links == | ||
| Line 92: | Line 138: | ||
{{dwrefguide|who_bf21.htm|Dust Breeding}} | {{dwrefguide|who_bf21.htm|Dust Breeding}} | ||
* {{tetrap|7/dust.html|Dust Breeding}} | * {{tetrap|7/dust.html|Dust Breeding}} | ||
{{BFA monthly}} | {{BFA monthly}} | ||
{{Master stories}} | {{Decayed Master stories}} | ||
{{TitleSort}} | {{TitleSort}} | ||
[[Category: | [[Category:Decayed Master audio stories]] | ||
[[Category:Stories set in the 26th century]] | [[Category:Stories set in the 26th century]] | ||
[[Category:Audio stories that use Delia Derbyshire's 2nd theme]] | [[Category:Audio stories that use Delia Derbyshire's 2nd theme]] | ||
[[Category:Seventh Doctor Main Range audio stories]] | |||
[[Category:2001 Main Range audio stories]] | |||
[[fr:Dust Breeding]] | |||
Latest revision as of 18:20, 20 November 2023
Dust Breeding was the twenty-first story in Big Finish's monthly range. It was written by Mike Tucker and featured Sylvester McCoy as the Seventh Doctor, Sophie Aldred as Ace and Louise Faulkner as Bev Tarrant.
It also debuted in audio form the Master voiced by Geoffrey Beevers, who had last played the role in The Keeper of Traken in 1981. It also featured Caroline John, known to play the Third Doctor's companion Liz Shaw, playing another character.
Publisher's summary[[edit] | [edit source]]
On nineteenth-century Earth, artist Edvard Munch hears an infinite scream pass through nature. Centuries later, his painting of that Scream hangs in a gallery on the barren dust world Duchamp 331.
Why is there a colony of artists on a planet that is little more than a glorified garage? What is the event that the passengers of the huge, opulent pleasure cruiser 'Gallery' are hoping to see? And what is hidden in the crates that litter the cargo hold?
The Doctor's diary indicates that the painting is about to be destroyed in "mysterious circumstances", and when he and Ace arrive on Duchamp 331, those circumstances are well underway.
Plot[[edit] | [edit source]]
Part one[[edit] | [edit source]]
On 1920s Earth, two doctors discuss about one of their patients, Edvard Munch the painter, who claims to be haunted by a mysterious voice. One of the two doctors informs the other the painter managed to create a picture, The Scream, representing the voice, and now seems calmer.
Centuries later, the Doctor shows Ace a room in the TARDIS where he keeps works of art he claims to have "saved" from mysterious disappearances, and informs her they are on their way to perform another one of those "rescues". They are directed towards Duchamp 331, a desolate planet destined to be a pit stop, but also the place where an artist, Damien Pierson, has founded an art centre with a gallery in it. Inside the gallery, there is a copy of Munch's Scream - the painting the Doctor wants to get.
Meanwhile, another ship is directed towards Duchamp 331: a luxury cruise led by Madam Salvadori, a self-proclaimed art lover, and her right-hand man, Klemp. Amongst their many guests, members of the elites of the universe, there is also the mysterious and wealthy Mr. Seta, whose identity neither of them manage to ascertain, and which brought on board a mysterious cargo.
Upon their arrival, the Doctor and Ace come across a desolate scenario. Not only is Duchamp 331 nothing but a great sphere made of dust, but the refill station they land on has been ravaged quite recently. They find only one survivor, and bring him to the main station which houses the art gallery. Here they are reunited with Bev Tarrant, a previous acquaintance, and meet Guthrie, the station manager, and Damien himself, who explains his project. The Doctor sends Ace to take a look at the gallery, as he and Bev check upon the survivor.
Ace enters the gallery and finds the painting of The Scream, but as soon as she glances upon it, she hears a voice screaming into her head and runs away in fear. In the morgue, the Doctor and Bev cut open the corpse of the man they saved and discover it's entirely made of dust; as they still try to figure out what it means, the dust reanimates and attacks them.
Part two[[edit] | [edit source]]
The Doctor is able to slightly open a vent, ridding them of the dust and saving his and Bev's life. Guthrie also arrives to open the door of the morgue, escaping in time and avoid being attacked by dust too. Encouraged by the Doctor, Guthrie tells them about the death of his partner, years ago, when they were building the station: the dust attacked them, and his partner was killed. Bev is ready to dismiss the story as an invention, but the Doctor instead accepts it as true, and gathers the dust really is animated and someone controls it - probably Damien.
In the meantime, Ace has stumbled across Damien, looking on the Doctor and Bev being attacked by the dust. Discovered, Damien knocks her out and shuts her in the gallery, waiting for the entity whose voice he hears from years to make her "connected" with it. The Doctor reaches Damien in time in the gallery and takes her place, connecting himself with the entity inside The Scream; at the same time, following the Doctor's instructions, Bev and Guthrie try planning an evacuation of the place.
Aboard Salvadori's ship, she and Klemp investigate the death of one of their guards, whom Seta killed as he approached his mysterious cargo. Seta threatens Salvadori of terrible consequences if they do not reach Duchamp 331 in time, but the woman, unfazed, orders Klemp and his men to open Seta's cargo. They find four eggs of unknown origin. Seta reaches for them and, using a device, causes the eggs to open, freeing four Krills who attack the crew. He also hypnotizes Seta, who then reveals himself to be the Decayed Master.
Part three[[edit] | [edit source]]
The four Krills decimate the crew and the guests of Salvadori's luxury ship, while the Master keeps her and Klemp hostages, so that the ship remains on its course to Duchamp 331. He intends to arrive there and pit the Krills against the entity. On Duchamp 331, the entity is possessing the Doctor and talks through him to Ace, introducing himself as the Warp Core, a sentient weapon created by an ancient civilization, later abandoned by its creators when they realised it was unstoppable. He found refuge on Earth, where he inspired and tortured Munch by acting upon his fears and obsessions, to the point Munch made a painting to trap him, and succeeded.
When the Doctor finally takes back his body, he realises the Warp Core has inspired and controlled Damien into gathering the colony of artists, whose minds he absorbed, getting enough power to control the entire planet and its dust. The Doctor confronts Damien, but the Warp Core has already gathered enough energy to free itself from the painting and take possession not only of Damien's mind, but of the whole planet. The Doctor, Bev and Ace barely managed to get out, the first one into the TARDIS, the other two on Bev's ship; Guthrie stays back to confront the dust to avenge his partner.
With Salvadori's ship in sight, all the survivors climb aboard, on two different levels. Bev and Ace come across a Krill (which the latter recognizes from a previous adventure), while the Doctor stumbles upon the Master.
Part four[[edit] | [edit source]]
The Master tells the Doctor the Warp Core was created to fight against the Krills; it's the only being they fear. He is bringing them to Duchamp 331 hoping they will fight against each other, thus weakening the Core enough for the Master to shut the Warp Core inside his TARDIS. He already tried that by stealing The Scream painting, but the Warp Core proved impossible for him to subdue; the Master lost his Trakenite body in the fight, and was reduced to his previous "decayed" form.
Ace and Bev, together with Salvadori, reach the Doctor and the Master avoiding the Krills; on the way, Bev scares away a Krill apparently only by shouting at it. The Warp Core approaches them and recognizes the Master, who claims to be behind his recollocation[?] to Duchamp 331 (the planet of the Krills after the Core destroyed it), Damien's foundation of the art centre and Salvadori's cruise, and proposes him an alliance against the Krills. He tries to offer Salvadori's life as a pledge, but Klemp breaks the Master's hold on his mind long enough to save Salvadori and be killed in her place. The Warp Core refuses the Master's offer and tries to kill everyone.
The Doctor, Ace, Bev and Salvadori escape and try to reach the TARDIS at the lower levels of the ship. When Ace tells him about the Krill scared by Bev, the Doctor realizes the dust on Bev's body frightens the Krills since it's a part of the Core's body. When they come across another Krill, Bev tries the trick again, but this time it does not work; only Salvadori's sacrifice allows the three of them to enter the TARDIS and save themselves from the Krill. Inside the TARDIS, the Doctor mentally contacts the Master and tries taking control of the dust to fight the Core, using also the energy from the Master's TARDIS. He eventually wins when, on the planet, Guthrie blows out his station with a lighter, engulfing the entire planet in a giant explosion and destroying the station and the Core.
The Doctor and Ace head back to Earth, visiting an art gallery to admire The Scream. The Doctor tells Ace the Core has been destroyed, but he is not sure whether the Master survived. He also gathers they have to bring Bev back to her own time - before she steals something from the museum they're in. Ace jokingly suggests the Doctor should take up collecting stamps instead in future.
Cast[[edit] | [edit source]]
- The Doctor - Sylvester McCoy
- Ace - Sophie Aldred
- Mr Seta / The Master - Geoffrey Beevers
- Madame Salvadori - Caroline John
- Bev Tarrant - Louise Faulkner
- Guthrie - Ian Ricketts
- Klemp / Ambassador - Mark Donovan
- Damien Pierson - Johnson Willis
- Jay Binks - Gary Russell
- Albert Bootle - Alistair Lock
- Skredsvig - Jez Fielder
- Maggie - Jane Goddard
- The Krill - Gareth Jenkins
- Lift Computer - Jacqueline Rayner
- Museum Announcer - Mark Wyman
Crew[[edit] | [edit source]]
- Cover Art - Clayton Hickman
- Director - Gary Russell
- Executive Producer - Jacqueline Rayner
- Music - Russell Stone
- Producers - Gary Russell and Jason Haigh-Ellery
- Sound Design - Gareth Jenkins
- Writer - Mike Tucker
Worldbuilding[[edit] | [edit source]]
Gallery[[edit] | [edit source]]

Original CD cover
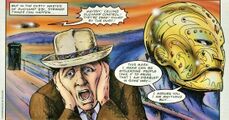
Art by Lee Sullivan featured in DWM 306

Textless version of the DWM preview art


Notes[[edit] | [edit source]]
- This was the audio debut for Geoffrey Beevers as the Master, which also marked the first appearance of the character in an audio drama.
- An illustrated preview for this story featured DWM 306 illustrated by Lee Sullivan.
- This audio drama was recorded on 31 March and 21 and 22 April 2001 at the Moat Studios.
- The first two editions of aHistory dated this story to circa 4260, but the third edition redates it to circa 5257 in keeping with the redating of The Genocide Machine.
- Andy Hardwick's score to the story, alongside the scores to The Rapture and Bang-Bang-a-Boom! was released on the CD Music from the Seventh Doctor Audio Adventures.
- Big Finish Productions had invited Anthony Ainley to reprise his role of the Master, but were unable to reach a suitable deal with him. The Tremas Master was thus written out by having the Warp Core strip the Master of his previous body, leaving behind his previous emaciated form — thus allowing Geoffrey Beevers to take over the role.
- This story is placed between Survival and the 1996 TV Movie.
- This story was originally released on CD. It is now available as a download, as well as to stream on Spotify.
Continuity[[edit] | [edit source]]
- The Krill previously appeared in PROSE: Storm Harvest.
- Bev Tarrant last appeared in AUDIO: The Genocide Machine and would later go on to appear in the Big Finish Productions Bernice Summerfield series.
- The Doctor would encounter this incarnation of the Master once again on Perfugium in the far future. At that time, the Master believed himself to be a surgeon named "Doctor John Smith." (AUDIO: Master)
- In his art gallery, the Doctor has a copy of the Mona Lisa. He tells Ace the one in the Louvre has "This is a fake" written in felt tip. It is implied that the Doctor has the original. (TV: City of Death)
- When the Doctor returned to the Louvre in his ninth incarnation, he said he preferred the original. (PROSE: Have You Seen This Man?)
- The Master refers to the Traken source for his previous body. (TV: The Keeper of Traken)
- The Master's TARDIS is once again in the form of a pillar. (TV: Logopolis, Castrovalva, Time Flight)
- The Doctor has a sculpture constructed by a Terileptil artist. (TV: The Visitation)
- The Master has been stripped of his Trakenite body before. (PROSE: The Velvet Dark, The Quantum Archangel)
External links[[edit] | [edit source]]
- Official Dust Breeding page at bigfinish.com
- Dust Breeding at the Doctor Who Reference Guide
- DisContinuity for Dust Breeding at Tetrapyriarbus - The DisContinuity Guide
| |||||||||||||||||||||||